After several attempts with Microk8s and its multiple errors on both LXC/LXD and physical servers, I switched to K3s, a simpler and lighter solution for K8s. The installation on physical servers and its performance were much better than Microk8s from the first hours, and I regret the hours I wasted trying to find the errors that Microk8s produced on the servers and in the deployment of services.
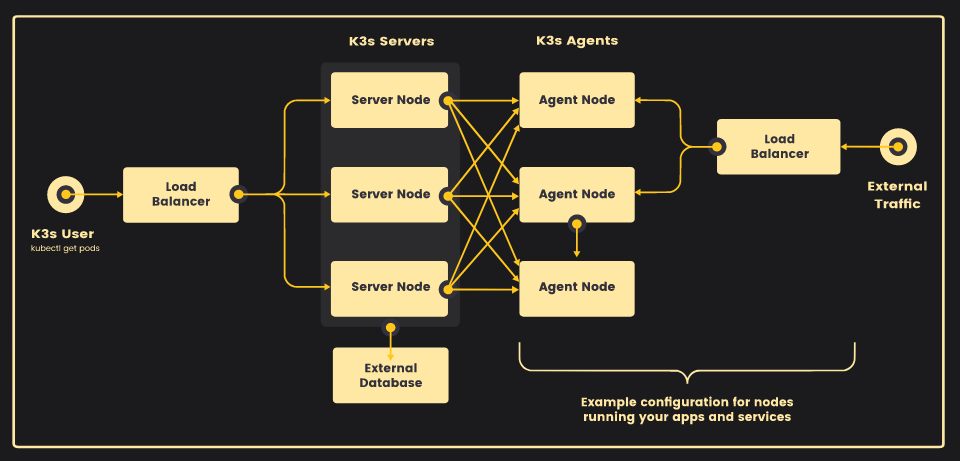
Here are some notes on how I installed K3s with HA using an external DB on Incus, as shown in the image:
Figure 1: K3s Architecture with HA using an external DB. Source: K3s Documentation
K3s with HA
To have HA, you must have at least a cluster with 3 servers. For this guide, I created 6 containers in Incus that formed the cluster, plus one container for the Postgres database.
Incus Profile
To run K3s on Incus, you need to use a specific profile, and fortunately, we can use the profiles created for Microk8s:
If the host system’s file system is ZFS, use this version
If the host system’s file system is EXT4, use this version
If you want your K3s cluster to be accessible from the local network, you can also include the network bridge in the profile. You can add the profile via the command line or using the Incus web interface.
Server Configuration
With the profile created, I used the Rockylinux 9 image:
Figure 2: Selecting the Rockylinux 9 image
Now, I prepared the server with these commands as the root user:
1
2
3
4
5
6
7
8
9
# adduser node# passwd node# usermod -aG wheel node# echo 'L /dev/kmsg - - - - /dev/console' > /etc/tmpfiles.d/kmsg.conf# dnf update && dnf upgrade -y# dnf install openssh-server nano nfs-utils wget curl ca-certificates -y# su node$ ssh-keygen
$ cat .ssh/authorized-keys # Add the public key from the host machine here.
We now have the basic configuration for all cluster servers. Just create a snapshot and create the other servers from that snapshot:
It is very important to configure a static IP for each server and specify each one with its hostname in the /etc/hosts file. In my case, this file looked like this:
As we have 6 servers, we will use 3 for the control-plane or server node and 3 as workers.
For the three servers with control-plane
On the master server, I installed K3s with these commands:
1
2
3
4
5
6
7
8
$ curl -sfL https://get.k3s.io |K3S_TOKEN=fs3J@ivWEjj@6n sh -s - server --cluster-init --datastore-endpoint="postgres://postgres:postgres@db:5432/k3s"# verify the k3s service:$ sudo systemctl status k3s
# execute the following commands:$ sudo cp /etc/rancher/k3s/k3s.yaml ~/.kube/config
$ sudo chown $USER ~/.kube/config
$ sudo chmod 600 ~/.kube/config
$ echo"export KUBECONFIG=~/.kube/config" >> .bashrc
Then, on the other two servers:
1
2
3
$ curl -sfL https://get.k3s.io |K3S_TOKEN=fs3J@ivWEjj@6n sh -s - server --server https://master:6443 --datastore-endpoint="postgres://postgres:postgres@db:5432/k3s"# verify the k3s service:$ sudo systemctl status k3s
On the 3 worker servers
Simply use these commands on all the remaining servers:
1
2
$ curl -sfL https://get.k3s.io |K3S_TOKEN=fs3J@ivWEjj@6n sh -s - agent --server https://master:6443
$ systemctl status k3s-agent
K3s Documentation
All the commands used and their parameters are found in the official K3s documentation in the High Availability Embedded etcd and High Availability External DB sections.
Verification and testing
If everything went well, we can check the status of the cluster from the master server:
1
2
3
4
5
6
7
8
[node@master ~]$ kubectl get no
NAME      STATUS   ROLES                  AGE   VERSION
node3     Ready    control-plane,master   166m  v1.28.7+k3s1
master    Ready    control-plane,master   3h18m  v1.28.7+k3s1
node2     Ready    control-plane,master   169m  v1.28.7+k3s1
node5     Ready    <none>                 163m  v1.28.7+k3s1
node4     Ready    <none>                 163m  v1.28.7+k3s1
node6     Ready    <none>                 162m  v1.28.7+k3s1
Testing with Microbot
Now, let’s launch a service with 6 replicas that can be accessed from the micro.reset.com domain: